Want to know how to add footnote and endnotes in Word? These are important for anyone who needs to cite sources. Do you need to add references? If so, you’ve come to the right place. Here I’ll show you exactly how to add both footnotes and endnotes, as well as learning how to style them in the best way possible. Ready?
What Are Footnotes and Endnotes?
Footnotes and endnotes are simple annotations that you can use for any variety of reasons. Some use them to explain things in more detail. Other times they are used to quote sources. And there are sometimes when you may want to remind yourself of something that isn’t especially relevant but you don’t want to forget about.
Footnotes are notes that appear at the end of a section whereas endnotes only appear at the end of the whole document.
How to Add a Footnote in Word
In order to add a footnote in Word do the following:
- Put your curser where you want the note reference to be.
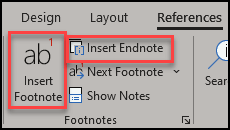
- In the References tab on the ribbon, select Insert Footnote:
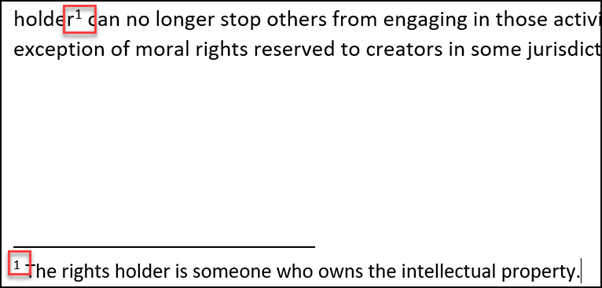
- You will be taken to the bottom of the page where you can type whatever you want.
- In order to return to the main body of text, simply double click on the number at the begining of the footnote:
If you have made a mistake and you want to remove the footnote do the following:
In the main body of the text, go to where the citation is and then press delete. You will see that the number is now highlighted. Not press delete for a second time. This will remove the footnote.
Please note that this is the only way to remove the footnote. You cannot remove a footnote by simply going to it and deleting all its contents. This will not actually remove the footnote, rather only the words that the footnote contains.
How to Add an Endnote in Word
In order to add an endnote you need to do exactly the same as you have previously done when dealing with adding footnotes. The only difference is the button you press. Instead of hitting the Insert Footnote button you have to press the Insert Endnote one.
How to Insert the Same Footnote Twice in Word
If you want to add the same footnote twice then of course the easiest thing to do would be to have the same number appear twice in the text. However, this isn’t that easy. In fact, it may just be easier to type the same footnote again.
Nevertheless, it’s much better to learn how to do so correctly. What I’m going to show you now is how to actually create a cross reference and add the styling to the citation so that it will act the same way that a normal footnote does. There are two steps to this process and I’ll go through them both. In fact, the second part really relates to how to format a footnote with a Style which you can find more about with that specific post.
To Insert the Same Footnote Twice Do the Following:
- Put your curser where you want the second footnote to appear.
- On the Insert tab in the ribbon, click on the Cross-reference button.
- On the dialog box, you are presented with a number of options concerning the reference type. Select the footnote or endnote that you want to repeat in the document.
- Press insert and you will see the number appear in your document.
- Please note that this number appears like any other character in your document. It does have some special features to it but to the plain view, it isn’t visible.
This is how to insert the same footnote twice. Now we have to ensure that the number you have added actually looks like a footnote instead of just a number randomly appearing in your document.
How to Change the Footnote Font in Word
Every single built in format has a style to it. What we have to do is to find out what the style of the footnote is and then, if we want, to change it.
In order to find the footnote font, do the following:
- Highlight the footnote in the document.

- On the Styles section of the Home tab, click on expand:
- You can see that the Footnote Reference style is selected. (If you don’t see it, see the instructions below on changing the actual font in the footnotes.)
- Now you have to put it in the actual Styles box so let’s do the following:
- On the right hand side of the style, you’ll see an arrow. Click this and you see the following:
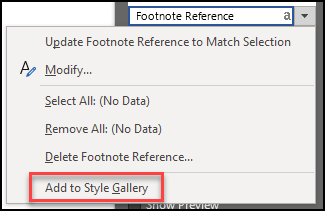
- Click Add to Style Gallery and then click away.
- This Style is now added to your Styles drop down box:
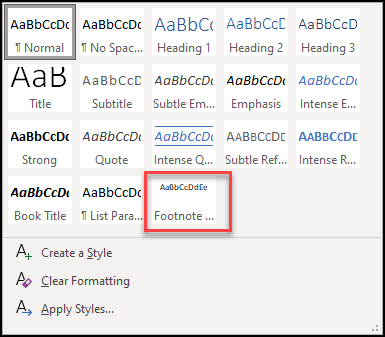
Now that this appears you can easily go to where your cross reference is, highlight it and then select the Footnote styling that you have now put in the Styles selection box.
That’s all good for the actual numbers. But what about the text inside the footnotes. How do you change that?
The answer is really exactly the same. Once you know what style you are starting from, you will be able to change it for any section that you want in your document.
To Change the Font Inside a Footnote do the Following:
Please note that I’m showing a slightly different way here. It could be that the first method works just fine. But just in case, here is the other method. Of course they are interchangeable.
- Highlight a portion of text in the footnote.
- Right click and on the pop up menu, select Style:

- On the new dialog box you will see what the style actually is:
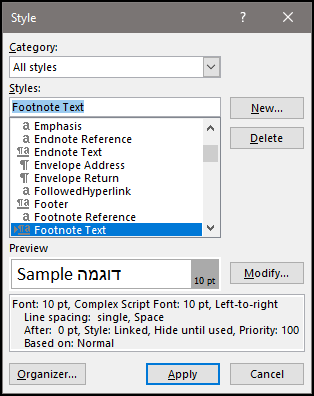
Let’s modify this style in order to have the same thing across the entire document. Of course you can edit each one individually. However, if you want something for the entire document, it’s important to use the Styles rather than the font settings.
- Click on Modify and you will see the style setting dialog box.
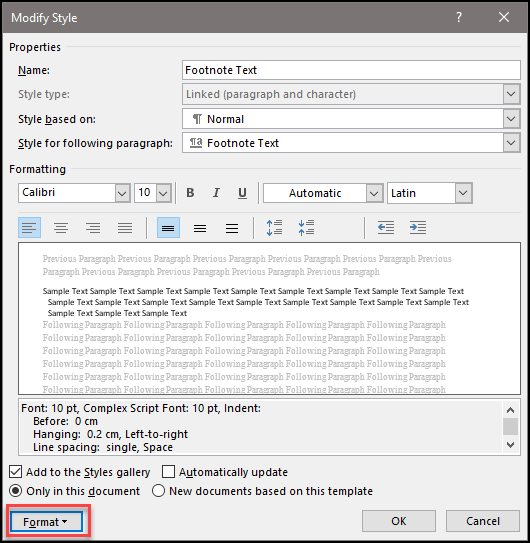
- In the bottom left corner you see the format button. Click it and then select what you want from there. What I’m going to do is create a hanging indent so that if the text runs into a second line, the text and the number of the note appear on the same line. FYI this is 0.16cm:
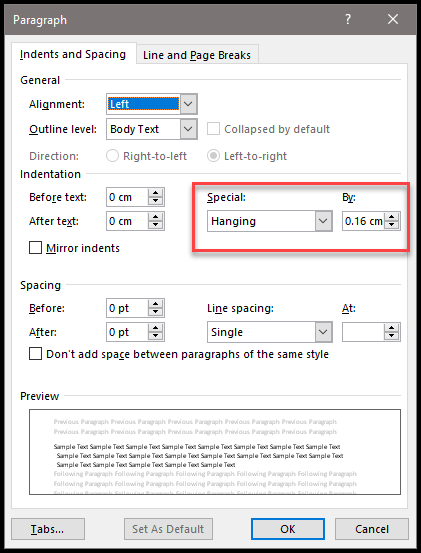
- Click OK a number of times to get back to the document.
The Footnote text format has been changed.
What’s the Difference Between an Endnote and a Footnote?
Apart from the obvious, there is a further difference between endnotes and footnotes when you are on the same (last) section of a document. A footnote will always appear at the bottom of the page. The same isn’t true for an endnote. Therefore, in the last section of a document, when you have both endnotes and footnotes, the endnote appears before the footnote.
Changing a Footnote to an Endnote and Vice Versa
If you have made a mistake and want to change the footnote to an endnote, the process is painless and easy.
- Put your curser inside the footnote and right click your mouse. You will see the following pop up.
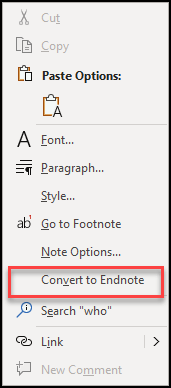
- All you need to do is to select Convert to Endnote.
- The footnote is converted.
If you want to change all the footnotes to endnotes then the process is a little more complicated but still simple:
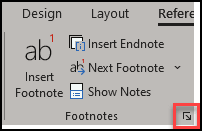
- Go to the References tab on the ribbon and open the Footnotes options:
- Select Convert and you will see another little pop up box (the image on the right).
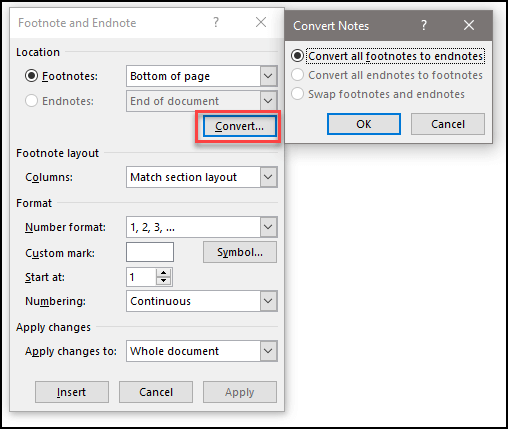
- Select OK and you will have converted all your footnotes to endnotes.
In Summary
It’s important to know not just how to add a footnote and endnote in Word, but how to interact with them and how to edit them when you need to. I hope you have enjoyed this post and, as always, if you have any questions or comments, leave them below and I’ll do my best to answer them.
