There are lots of things you can do with indentation in Word. From ensuring that your bullet lists are clear, emphasizing paragraphs, creating hanging indents and more. In this post I’m going to go through how to create a hanging indent, how to automatically indent as well as other uses and step by step instructions.
Here’s what on the page so you can find what you are after quickly:
- How to Apply Indentation in Word
- Using the Ruler to Apply Indentation
- Adding Indentation Using the Styles Options
- How to Automatically Indent in Word Using the Styles Options
- How to Make First Line Indent in Word
- How to Add a Second Line Indent: How to Add a Hanging Indent on Word
- How to Indent an Entire Paragraph in Word
What Is Indentation on Word?
In the olden days of pen and paper, in order to start a new paragraph, I was told that you have to indent the first word of it. In order words, leave a gap of about 1.5 cm and then start writing. I don’t know whether this is actually taught in schools this way anymore as so many people use computers instead of pen and paper. Be that as it may, this is probably the reason why the function has always been around in Word.
Why and When Do You Use Indentation on Word
As using computers and Word has become so common nowadays, the actual styling of indentation has in a sense, gone out the window. It used to be that there was no line space between one paragraph and the next. Rather the first word of the paragraph was indented. However, since we have a space between each paragraph nowadays, the reason for using indentation has become much more of a stylistic thing rather than an absolute necessity.
This being the case, we can do a lot more with indentation on Word to stress different areas of text, lists, or anything else for that matter. All you need to know how is to know the basics and you can play around with them however much you want.
How to Apply Indentation in Word
The quickest and simplest way to add indentation to your document is to use the Tab key on your keyboard. Obviously this is per paragraph and you will have to do so every single time you want to start a new paragraph with an indent.
This can become rather cumbersome as well as an annoying time waster. There are much better methods and I’ll go through them below.
Using the Ruler to Apply Indentation
If you want to eyeball and not get into how many centimeters or inches to add then use the following method:
- Place your curser somewhere in the paragraph that you are working on and that you want all these types of paragraphs to be indented.
- On the Home tab, click on the Select button and then click on Select all text with Similar formatting:
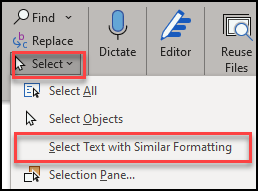
- This will highlight all the relevant text with this formatting.
- On the View tab, click the show ruler option:
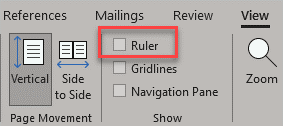
- You will now see the ruler on the top of your screen.
- Looking at the image, you can see three different “bits.” Each of these does something different to your document:

- By dragging the arrows, you can create the indent that you desire.
- The top arrow indents the first line of the paragraph:

- The bottom arrow affects the other lines of the paragraph. Please note that even though the bottom rectangle has moved as well, I have actually only moved the arrow.

- The rectangle moves the entire paragraph:

This is obviously rather long winded but it does work. The better method is to use the Styles options on the Home tab.
Adding Indentation Using the Styles Options
The Styles are the mainstay of formatting throughout Microsoft Word and it’s important to know how to use them properly. This is especially true when it comes to indentation. You can set it up so that it will apply what you want in this specific document or in any future documents. If you want to see more about how Styles work in Word, check out that specific post.
How to Automatically Indent in Word Using the Styles Options
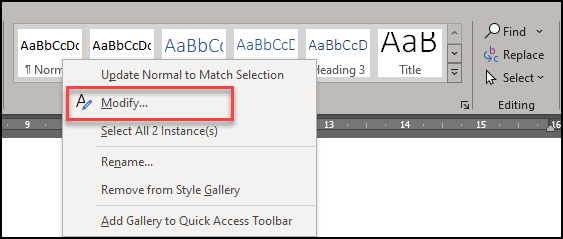
- On the Home tab, right click on the style that you want to change. In this example, I’m going to add an indent to the Normal template. Select Modify:
- If you want to use the Word defaults, you can just use the Indent options in the dialog box.
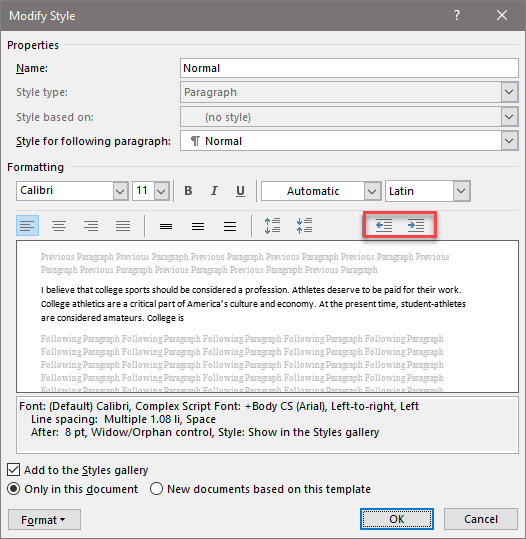
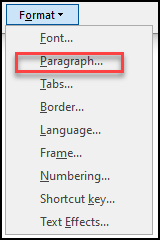
However, if you want something a little more, than you need to navigate to the Format button at the bottom of the dialog box and then select the Paragraph option:
- Everything about indentation is controlled by this little area in the center of the dialog box:
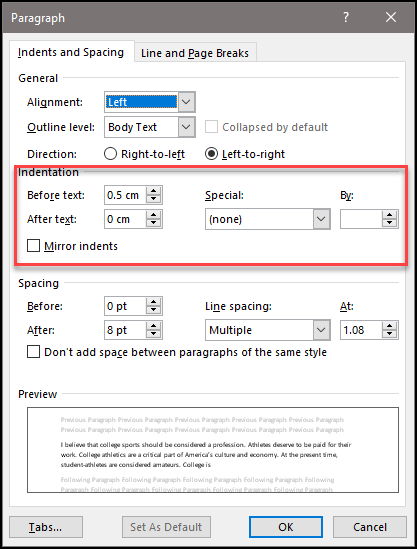
- Simple select your desired indentation levels and then press OK.
- Back in the Styles dialog box, you have the option to have this style that you have just modified be for this specific document or for all the documents. That choice is up to you.
And that is how you automatically indent in Word. It requires a little bit of setting up, but once you have done it once and selected that you want it to be this way for all future documents, you will have done it. It really is once and done!
If you want to have different indent levels for different paragraphs in your document though, continue reading and I’ll show you each of these options.
How to Make First Line Indent in Word
If you want to make a first line indent in Word for a specific paragraph, you don’t need to go to the Styles section but rather to the Paragraph section of Word. To access these settings, do the following:
- Ensure your curser is in the paragraph that you want to change.
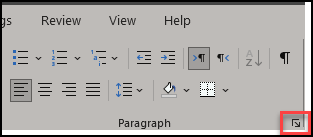
- On the home tab, select the Paragraph button on the bottom right corner of the section:
- This opens up our Paragraph dialog box.
- Let’s say that you want to have a first line indent of 0.75cm. Therefore you should input the following in the dialog box:

- This will give us a first line indent that we desire:

How to Add a Second Line Indent: How to Add a Hanging Indent on Word
A second line indent is more commonly know as a hanging indent. In order to do so for a specific paragraph, do exactly the same as before with just a slight change:
- Ensure your curser is in the paragraph that you want to change.
- On the home tab, select the Paragraph button on the bottom right corner of the section.
- On the indentation settings, in the Special section, select Hanging:

This changes the indent and that’s how to add a hanging indent on Word.
This is especially useful when you want to add a hanging indent for works cited.
How to Indent an Entire Paragraph in Word
If you need to indent an entire paragraph in Word you can do so with the same Paragraph dialog box. All you need to do is change the indentation in the Before text and After text fields.

I have added a 2 cm indentation and this is the result for the entire paragraph:

In Summary
There are quite a few ways to add indentation to your document. If you want to use it for a specific paragraph, or if you need to change the whole indentation settings for your document, there are pretty easy ways of taking care of it. I hope you have enjoyed this post. If you have any comments or questions, please let me know below and I’ll do my best to answer them as quickly as I can. Good luck!
