How to Combine Pictures into One – How to Add a Picture to a Picture
If you have two separate pictures and want to combine them into one and you want to do so in word, then the steps are pretty easy. There are two steps involved in making this happen and it’s important that you ensure that you do step one. There is no way round it and can lead to huge frustration if you don’t do this first step.
Step Number One- Ensure Your Pictures and Not in Line with Text
When you insert a picture into word, in general, unless you have changed the defaults, the picture appears in line with text. What this means is that it’s like a piece of text. You move it with your spacebar and delete it by pressing backspace or delete. However, you cannot have your pictures on this setting when you want to combine the two.
After you have combined them, if you want to change the way the picture is on your document, there is no issue, and you can change it back to in line with text. However, in order to combine the two, you have to have both pictures on any of the other settings.
If you want to learn more about what each of the other settings do, please check out that particular blog post on how to move a picture freely in Word.
To change the picture to Not in line with text do the following:
- Select the picture and you will see the wrap text button in the top right corner of the picture. You can also navigate to it in the Picture Format menu on the ribbon.

- You can see that there are a number of different options that you can choose from. I suggest using In front of text for this task but to be honest it doesn’t make a lot of difference as long as you don’t select in line with text:
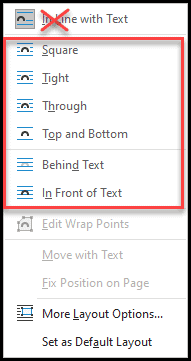
- You might see the pictures move around and that’s fine.
- Click on the pictures and move them to where you want them to be in relation to each other. For example, if you want a little bit of space or perhaps a slight overlap go ahead and do so now.
- Once you are happy with this, then we can move onto step two, actually combining the two pictures together.
Step Two – Combining the Two Pictures Together and Putting them Side by Side
Once you have the two pictures where you want them, now it’s time to combine them together.
- Click on the first image.
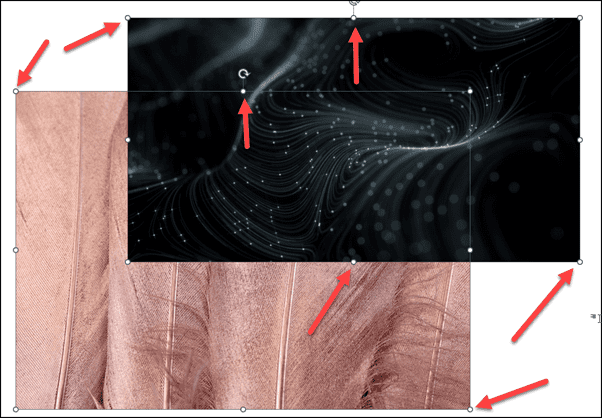
- Whilst holding down the Ctrl key on your keyboard (Command key on mac ⌘) click on the second image. You should see that the selection circles are now on both pictures:
- Right click anywhere on one of the pictures and then on the pop-up menu select Group:
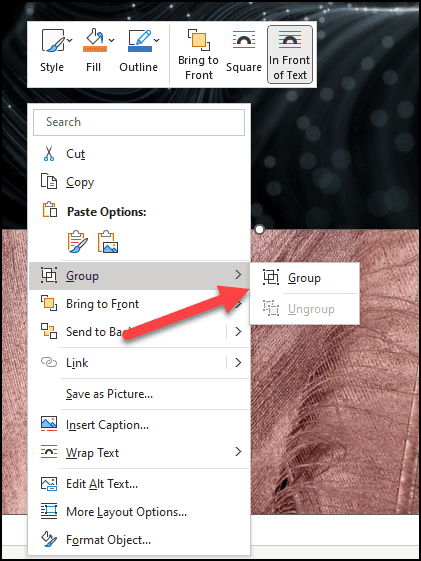
- This combines the pictures into one that you can move around the screen as if it’s one single picture.
How to Make a Picture Collage in Word
Whilst there is no specific tool that you can use in order to make a picture collage in word, there are several methods that you can use to create one.
Method One – Using SmartArt
There are many different types of SmartArt designs, and you can use any of them in order to create your collage. Let’s take a look at one together.
- On the insert menu, select SmartArt:

- On the pop up window, you can scroll through the whole lot and select one that takes your fancy.
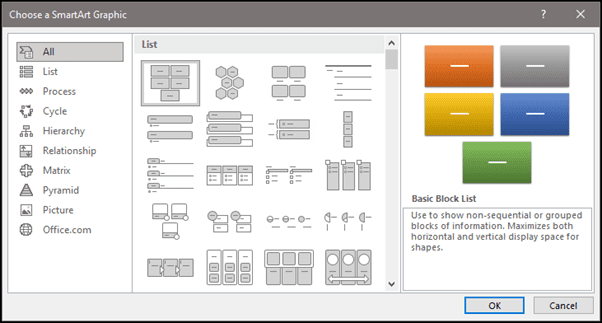
- I’m going to use the basic pie one that you can see in the Cycle section. This is how it looks after I’ve inserted it:

- Right click on one of the shapes and on the fill menu that appears select fill with picture:
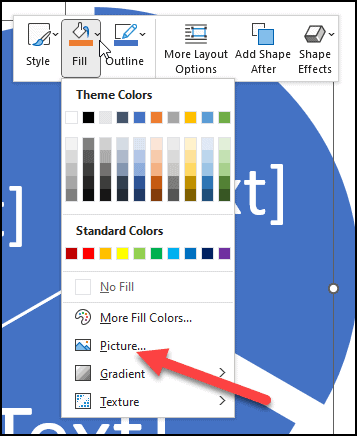
- I’m going to do this for all of the sections and this is what I have now:

Obviously I don’t want to have the word [Text] in my collage so let’s make sure to remove that. In order to do so simply put your curser where it says [Text] and press space. This removes the instruction telling you to add some text there.
That’s it. Pretty easy when you think about it.
Method 2 – Designing Your Own Collage
If you want to have your own design, this is also pretty easy and shouldn’t really take you much longer than finding a pre-existing format. This is what you need to do.
- On the Insert menu click on Shapes and then start adding shapes in the way that you want your collage to look. This is what I’ve come up with as an example:

- Right click on an image and from the drop-down menu select Fill and then select Picture:

- Select the picture that you want and click on insert.
- Voila! Your image has been added to your shape. Continue adding all the images that you want, and your collage will be complete.
You may want to remove the outline from the pictures that you have added. In which case, do the following:
- Click on the picture.
- Whilst holding down Ctrl click on the remaining pictures. What this does is that it selects them all. This saves you time when you come to removing the outline.
- Once they are all selected, on the Shape Format tab in the ribbon, click on Shape Outline.
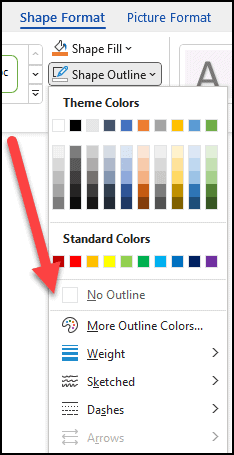
- Select No outline.
- All the outlines from the collage have been removed:

You can even add a background to this collage very easily with the same method.
How to Overlay Pictures in Word
Adding a background to a collage uses exactly the same method as adding an overlay picture. The steps are the same so I’m going to use the same example as above.
- Add a rectangle directly on top of the collage.
- Insert a picture using the fill option as above.
- Right click on the picture and select Behind Text from the Wrap text menu.
- Remove the outline.
- And hey presto, you have a background as well ?
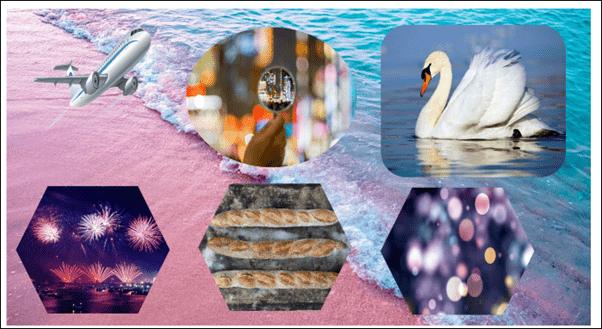
If you want to group them all so that you can move everything together, please see above.
Changing the Opacity of the Pictures
If you want to blend in some of the pictures into one another, you can do so by changing the transparency of the pictures. In order to do so, do the following:
- Right click on the image; on the Fill menu, select Gradient and then More Gradients:
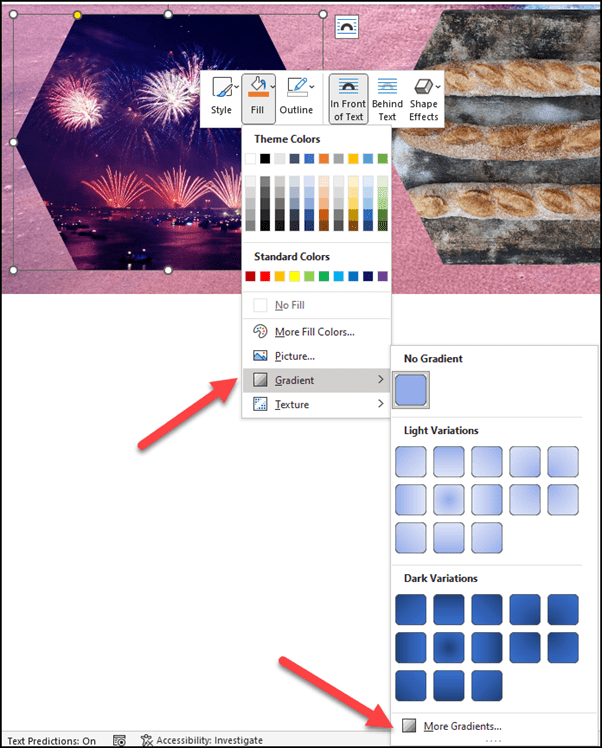
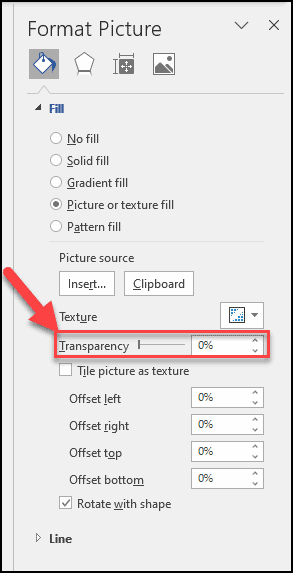
- You will see a new panel opens on the right of the screen called Format Picture.
- On the Transparency section, use the slider to change the opacity of the picture. You will see that the picture that you have selected changes as you move the slider right and left:
In Summary
I’ve gone through how to combine pictures into one, how to insert multiple pictures, how to put one picture on top of another in word as well as how to make a picture collage. As you can see, these are not overly difficult skills if you follow my instructions. I hope you have enjoyed this post and hope you have learned how to do the task that you want. If you have any question or comments, please leave them in the comments section below and I’ll try my best to answer them. Good luck!
