Do you have a footer or header in your document that you want to remove? Follow these easy steps to get it done quickly and easily. As well as this, I’m goiing to show you how to resize your margins so that your document will look good even without a header or footer. Ready? Let’s go!
Removing the Footer in Word
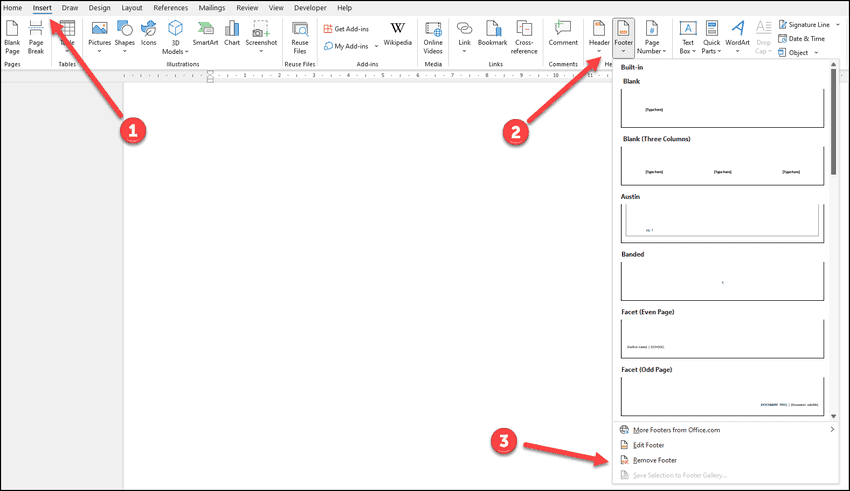
If you need to remove a footer in word all you need to do is go to the Insert menu on the Ribbon, click on the Footer button, and then remove footer:

That’s the straightforward way of how to remove a footer in Word.
Alternatively, if there is text in the footer, you can double click on the text and delete whatever is there. This accomplishes the same thing and “removes” the footer from your document.
That’s not all though, what about if you just want to remove not just the footer or the header for that matter. Headers and footers take up space of a page that you want to print. If you don’t want them, then you don’t want them taking up printing space as well. So how do you go about ensuring that you are showing the maximum on a page? Read on to find out how.
How to Change Margins in Word
In order to change the margins in word so that your footer will not be too big and take up too much space you need to see how it actually looks.
You can do it by using the Microsoft defaults but who says that that is what you actually want. I often feel that the margins that they give as standard aren’t really what I’m looking for. Therefore I change them manually. This is what we are going to do:
- Show to ruler
- Zoom the page to 100%
- Move the Margin to however we want it to appear
In order to do so we first have to make the Ruler appear.
Step #1 To Show to Ruler Do the Following:
On the View menu of the Ribbon, click on Ruler:

It’s important to ensure that you have the entire page showing. By this I mean you have to be able to see the gaps between the pages and not be hiding the white space between the pages.
If between your pages in your document you see a line then you have to show the white space. The easiest way to do so is to move your mouse to in between the two pages and you will see a small icon saying, “Double-click to show white space.” Do this and you will now see that space:

Step #2 Zoom the Page to 100%
You may normally work with your page enlarged. I certainly do. However, you want to be able to see what you will be printing so I advise you to have the page at 100%. This is the size of the text and paper that you will be printing.
In order to zoom the page you can either hold Ctrl and roll your mouse wheel or use the zoom control at the bottom of the page:

Step #3 Move the Margin with the Ruler
On the left side of your screen, where you see the ruler, at the top of your page, you will see that it isn’t white but a more grayish color, (forgive me, I’m colorblind).
Mouse over to there and it changes to a double arrow. Move this arrow up and down to re-margin your document. This affects all the pages in your document, you don’t need to worry about which page you make this change on. (If you are using sections, then it will affect just that section, but since that’s more advanced I’m not going to cover that here. If you want to know about different sections, please check out that specific post.)
You will see a dotted line across the width of the document to show you how it will actually look. This makes it easier for you to judge it.

Changing Margins with Word Options
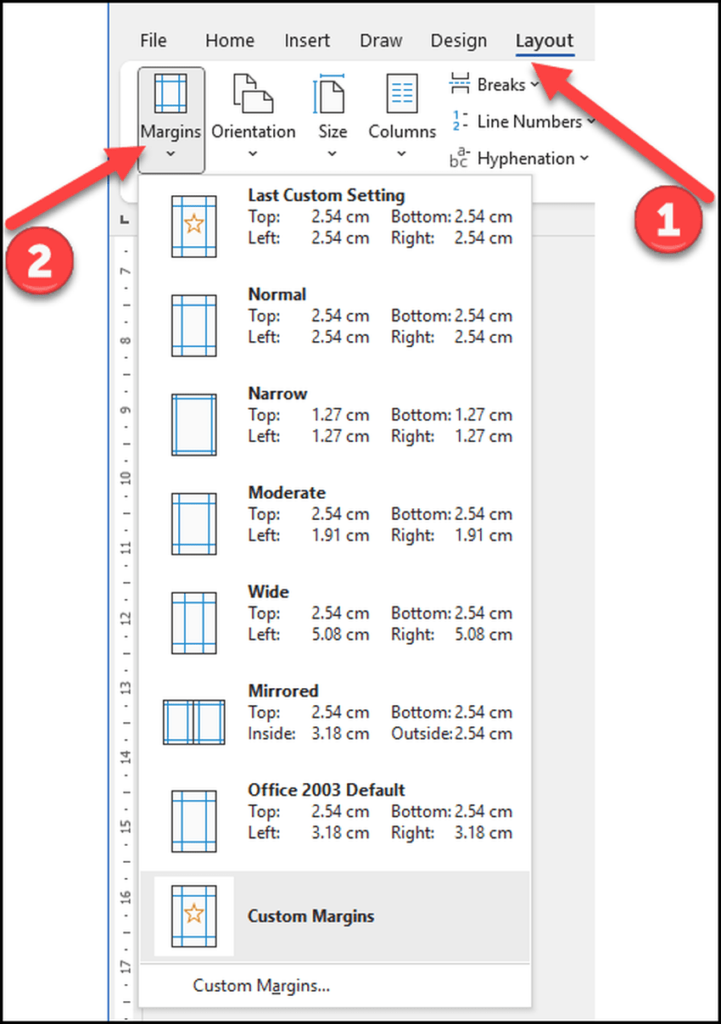
If you feel that you just want a simpler way, you can do so by clicking on the Layout tab on the Ribbon, and then selecting the Margins button:

In Summary
I have gone through how to remove the footer in Word. As well as this, I have shown you how to change your margin sizes so that the automatic level of margin that comes with having a header is removed. I hope you have enjoyed this post and as always, if you have any comments, please leave them below and I’ll try my best to answer them all. Good luck!
