If you have a paragraph on your document that you want somewhere else there are a few quick and easy solutions that you can do so to make it happen. In this post, I’m going to go through how to move a paragraph in word. As well as this, I’m going to show you how to move entire sections of your document, so you’ll be able to have complete control over what you have typed and where you want it to be.
How to Move a Paragraph with a Simple Shortcut
If you have to move a paragraph I would honestly say that the simplest way to do so is to use a simple keyboard shortcut:
- Put the cursor anywhere in the paragraph that you want to move.
- Press Alt + Shift + Up/Down arrow.
This moves the selected paragraph anywhere you want. If you want it five paragraphs later, then press down five times. If you want to move it up, then press the up arrow five times. It is as simple as that.
How to Move Text in Word
If you want to move just a few words or a sentence that is inside a paragraph, then the best way to do so I have found is to use the cut-and-paste functions in Word
- Highlight the text that you want to move.
- Press Ctrl + x on your keyboard or use the cut function from the Home menu on the Ribbon:
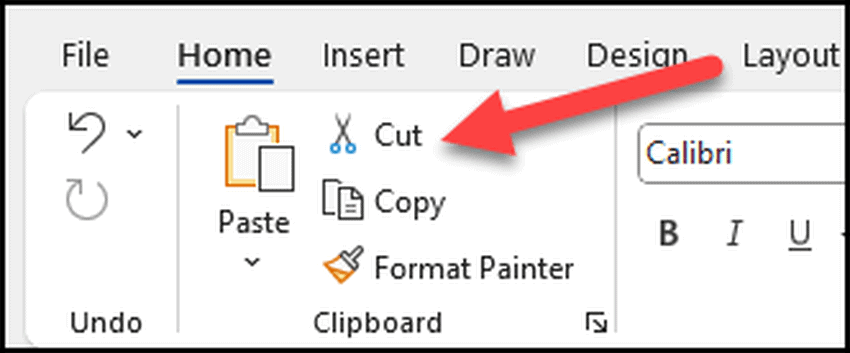
- This removes the text from the location it was in.
- Locate where you want the text to appear and place the cursor there.
- Press Ctrl + V or click on paste to put the text where you want it to appear.
How to Move Entire Sections of Text in Word
If you have to move entire sections of your document the first thing that you need to do to achieve this is to ensure that you are using the styles available to you. Word comes with built-in styles for different headings and text that you can use throughout your document. In general, what you will be using on a day to day basis is Heading 1 for your title, Headings 2 and 3 for your sections and sub-sections, and Normal for the rest of your text.

If you are doing this already then fantastic. If not, please check out my blog post on that subject so that you will be able to do so. It will save you so much time overall and also ensure that your documents all share the same look and consistency across the board.
Method #1 – Using Collapsible Headers to Move Sections of Text
There is an amazing feature that you can use in Word to see the outline of your document whilst staying in the Print Layout of your document. If you look carefully at the beginning of each and every header that you add to your document, you will see a small triangle. If you’ve wondered what that was, well, now is the time to find out!

If you click it then the paragraph that sits under this heading will collapse. It’s important to note here that this works by heading levels. Since everything sits under one single heading 1, everything will be collapsed if I close heading 1. However, if I close the heading 2, the Heading 1 will stay open along with the text inside, the heading 3s will disappear and the heading 2s will all collapse.
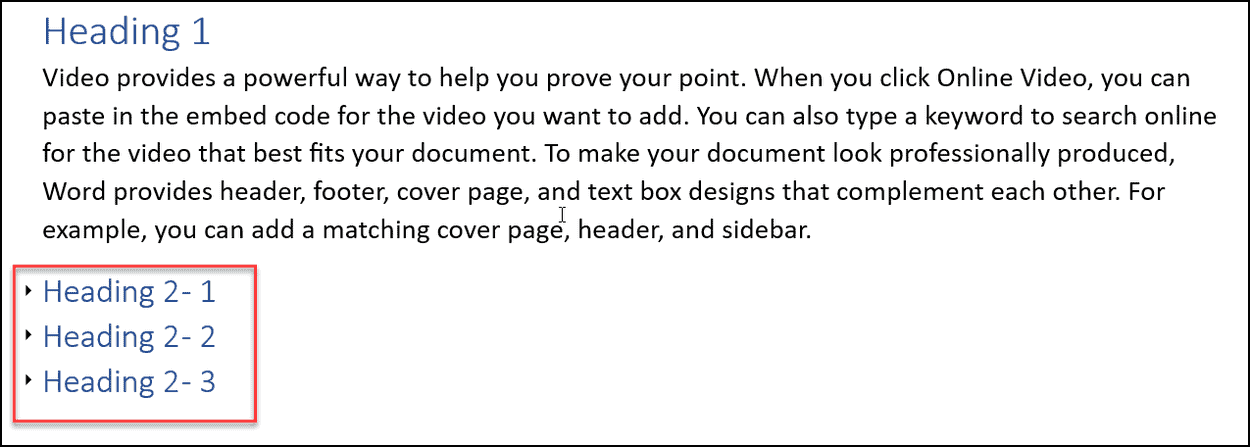
Sorry, that’s a mouthful. Here is a visual representation of each one:
Heading 1 Collapsed
Collapses everything as it’s a higher level than everything else:

Heading 2s: Collapsed
Heading 1 stays open but collapses all headings 2 and encompasses heading 3:

Heading 3s Collapsed
All headings 2 and 1 stay open as they are on the higher level:

Let’s say that I want to move heading 2-3 above heading 2-1. All you have to do is collapse all heading 2s and then you will be able to just drag them around.
Simply highlight the heading that you want to move and drag it to where you want. This will move the entire content of everything in that section (including the subsections) to where you want it.
Method #2 – Using the Outline View
A further method, and perhaps this is the best one, is to use the outline view in your document. To see your document in this view, click on the Outline button in the View tab of the Ribbon:

As soon as you click this button, you will see a substantial change in your document:

There are a number of different options here as well that you can play with to see how it looks. However, for our purposes, you’ll notice that there are various levels here. Since I already know what’s in each section, I don’t need to see the different paragraphs. Therefore on the Show Level area, I’m going to show just level 3. This means that only the headings 1,2 and 3 will be on display on my screen. This is the result:

There are a few things I can now do with this setup that makes moving a paragraph really easy.
First of all I can move the paragraph up or down using the arrows on the left:

Simply put your curser in the heading that you want to be moved and click the arrows up or down to move the entire section to where you want it.
As well as this, you can change the level of the section by using the arrows where the level text is. At the moment you can see that I’m in a level 3 paragraph, If I want to change that to a level 2,1 or more than 3 (even body text), I can do so using those arrows:

If I change this to a Heading 1 you’ll see that this is what it becomes:

As you can see, the level has changed, and the content has become a Heading 1.
And of course, you can move this section up and down by using the up and down arrow buttons.
What I really like about this view is that you can see your whole document in its outline. I like to use it when I’m planning as well. It helps concentrate my thoughts and how best to put them into writing.
In Summary
I’ve gone through how to move a paragraph in word. Along the way, we’ve seen the different methods of moving text and sections so that you are in control of the way your document looks. I hope you have found this post helpful. If you have any questions or comments, feel free to leave them below. Good luck!