Microsoft Excel is great at handling numbers. Unfortunately, Word isn’t so. Often it’s much better to add a table or chart from Excel to Word in order to create a report rather than working with Word by itself. Let’s learn how to insert a table from Excel to Word and use the different options in Microsoft Word in order to give your table a bit of style.

Inserting Your Table Using Copy and Paste
The first method that we are going to use is a simple copy and paste from excel to word.
- Go to your table in Excel and select it all.
Top tip – select a cell within the table and then press Ctrl + A. This selects the entire table.
- Copy the data either by pressing Ctrl + C or by selecting it on the Home tab.

- Go to your Word document and paste it wherever you want.
There are a few different Paste options available, and we’ll go through them now.
Using the Default Paste Option
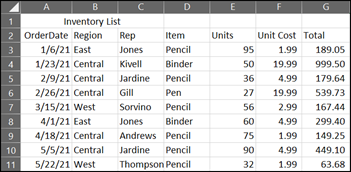
In the default paste option, the data gets put in exactly as it shows in excel. In the example data that I am using, you can see that in excel there are no cell borders. The same is true after pasting it in word.
Whilst in Excel not having borders is fine as you can always see the data in individual cells, the same isn’t true in Word. Let’s look at two examples of the same data, one from Word and the other from Excel:
Table Data from Word

Table Data from Excel

As you see, the data is way easier to see and discern what goes where in excel than in Word.
That, apart from anything is a good reason to use Excel for larger tables than Word.
The problem with this method is where formulas come in. In our table, the total is calculated by multiplying the units by the unit cost. For example, 95 * 1.99 = 189.05. This is calculated automatically by excel and whenever I change the data in either the Units or Unit Cost cells the total will automatically adjust to it.
However, when just pasting the data into Word will the default paste, you won’t see it update and all it does is paste the values into the document. It will not keep the formulas in the table.
In truth, the reason why this is the default is because when you are using a table from Excel in a Word document the reason is because you are preparing some kind of report. You don’t need, or even want Word to be doing these kinds of calculations. But we are going to go through a more advanced method as well to show you how to link the Excel file to word so that everything will be equal. Changing the data in Excel will automatically change the data in Word.
Using the Link Option When Pasting a Table from Excel
- As before, highlight the Table that you want to bring into Word.
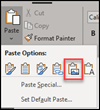
- On the paste menu there are two different options that you can select, Link and Keep Source Formatting and Link and Use destination styles.

The difference between them is pretty easy to understand. Word has its way of showing tables, and Excel has its. All you are choosing is how to show the data.
- Go ahead and select the one that you want.
- This will paste the table into Word.
Bear in mind that since you have a link between them this means that you are pulling the data from Excel into Word. In Word all you are showing is a representation of the data, not the data itself. For this reason, you cannot edit the data in Word but have to do so in Excel.
However, when you do edit that data in Excel, it will update in the word file automatically and instantaneously. You can obviously change the style and look of the table within Word though and you can find out how to do that in this post that I’ve written to explain how that works.
Paste Your Table as an Image
A further option that you can use, and it’s one that could be especially helpful if you don’t want your data to be manipulated in any way, is to simply paste the table as an image. This may look like a normal table but in this case, it’s an image so acts according to all the rules that govern images.
To insert your table as an image do the following:
- Select the table in Excel and copy it.
- In Word, select the option Picture.

- This will insert the table as a picture or image.
- You can of course move the table around any way you want by using the Layout options button which appears when you click on the table/ image:

In Summary
Knowing how to insert a table from Excel into Word is an important skill that many get wrong and this causes real angst. I hope I’ve helped making things clearer for you, explaining the different options available and how you can use them. If you have any questions or comments, leave them below and I’ll do my best to try and answer them all in a timely manner.
