The first thing that you want to do when you open up Word is just to get to work. There are so many different fonts and styles that you can use and you want to be able to keep your work uniform. Let’s get first things first though. Setting a default font in Word may seem basic, but it’s definitely worthwhile.

How to Change Default Font in Word
In order to change the default font in Word simply do the following:
- Navigate to the little arrow on the Font box in the Home tab on the ribbon.
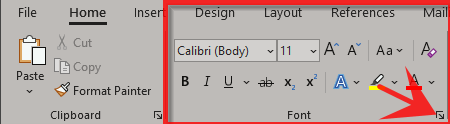
- This opens the Font selection box.
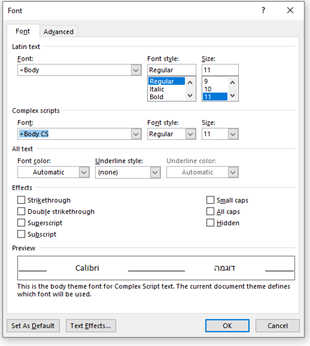
- Please bear in mind that your one may look slightly different to mine depending on what language you have installed.
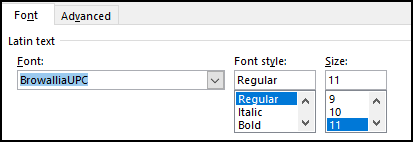
- Select the Font that you want from the top drop down menu.
- Click on the option named Set As Default
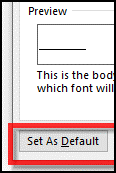
- You are presented with another pop up box describing what you are about to do:
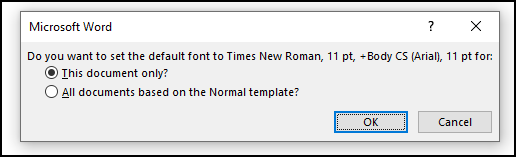
- Since you are trying to set up the default font for Word you need to select the option All documents based on the Normal template.
- Select OK
And you will have changed the default font for Word. The next time that you open Word you will see that the font that you have selected is the font that you are typing with.
If you even need to change it back you can go through the same steps again in order to do so.
This is just the start of fonts in Micorsoft Word. Let’s take this a step further.
How to Change Font Size on Microsoft Word
Changing the font isn’t enough, you also want to change the size as well. There are of course a number of different ways to do this. And of course, to make things a little more complicated, the method can changes if you want to change the size for just a section, line or even word.
Changing Font Size Method #1
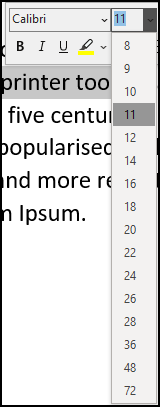
This is for sure the easiest method to use and one that I recommend for specific words:
- Highlight the text that you want with the mouse and a small pop up box appears.
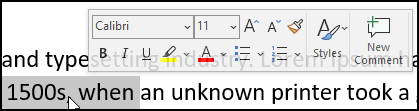
- Simply select that size that you want.
And that is it.
If you have selected the text and then not seen the pop up box then you can either right click on the mouse on the text that you have selected OR press the right click button on your keyboard if you have one. It looks like this:

The other option is to press Shift + F10.
Using Styles to Make Life a Little Easier
Using the normal Font function is OK but when it comes to making titles, headings and quotes there is a much simpler way of doing this and that is by using Styles.
Look at the Styles bar on the Home tab. I know that a lot of people are quite scared of this and that they have no idea what the point of such a thing is. Let’s take a quick dive into it so we can see some of the different things they can do.
Essentially, when you use a style you are affecting a whole paragraph. By paragraph I mean that it the space before you press Enter. In other words, it is the text placed between “Enters”. This can be a heading, a quote, a paragraph, whatever.
There are a number of different buttons here so let’s look at some of the more popular ones:

Normal: This is the default font on your document.
Heading 1: This is normally the title of the document and will only be used once. There is an exception to this and that is when you are writing a book or the like where it would be accepted to have a Heading 1 at the start of every section.
Heading 2: This is the normal heading of new paragraphs if necessary. If we take this post for example, every new “section” has a Heading 2 or H2 at the beginning of it.
Heading 3: This is used as a subheading in an H2 paragraph.
These are the main ones that are used. For more detailed information about how to use styles check out that particular post. However, for us discussing changing fonts, this is enough to know.
How to See What the Actual Styles Mean
If you want to know what and how the style has been set up you can simply right click on the specific one and then select modify:
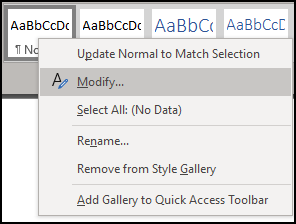
You will see the following:
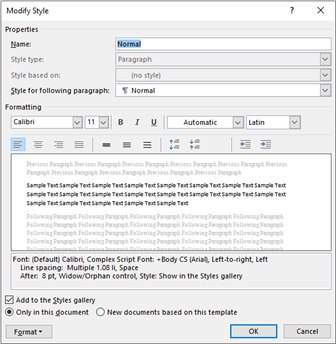
You can name the style differently, change the font, line spacing and other options as well. The good thing about this is that the Sample Text box is big and detailed enough that you can actually see the changes that you want to make in real time without having to worry about your real document.
Troubleshooting the Default Fonts in Word
If you have difficulty changing the font for whatever reason the best way is to reset it. There are many reasons why this may happen but the bottom line is that you want to change the font and you are simply not able to do so.
The reason why you can’t change the font to the one you want is because there is some extra formatting in the text that you cannot see and this is blocking you from changing the font. What you need to do is simply to remove the formatting and then you can start again.
To remove the formatting the best way and the only way I’m going to recommend is the Clear All Formatting.
- Highlight the text that you have a problem with OR, if you have an issue with the entire paragraph you can just put the curser there.
- On the Home tab just click on the button Clear All Formatting
- Your extra, annoying formatting will be removed and you can then add whatever you wish.
Bear in mind that the formatting will be removed and your text will now be in the default font that you have set up in word. It’s actually going to be the Normal style.
In Closing
There are many different ways to change the font of your document. We have gone through many of them and I hope you have found this post helpful. If you have any other topics that you would like me to go through and explain, please let me know.