If you have a document and want to point readers in the direction of specific content, then the best way to do so is by adding anchor links with the word tool known as bookmarks. These are actually found in table of contents as well as throughout areas of documents that you may have come across. In this post, I’m going to go through how to add bookmarks in Word. If you want to know about how anchor are used in pictures and images, please check out that specific post.
Before you Start – Understanding Styles
In order to make your life easier in Word, it’s important to play along with their rules. By this I mean that when it comes to styling your document, if you play along and want to keep things simple you will save yourself a lot of time. If you look at the top of the Home ribbon, you will see a section called Styles:

I’m not going to go through all the diverse types of things that you can do here. If you want to see how to edit them and a thorough walkthrough of everything to do with styles, please check that post out. However, for the purposes of this post, I’m just going to go through the different styles that you should be using on every document.
Normal– this is what you should be using for all text.
Heading 1 – this is used to start a section of the document if you have more than one section. If you only have one, then this is the title of the document and is used only once.
Heading 2– this is used for subheadings throughout the document.
That’s about it for general documents.
The reason that I write this before I start going into how to add a bookmark is because if you follow these rules, adding a bookmark will be much easier.
How to Add Bookmarks
- Ensure that your curser is where you would like the bookmark to go.
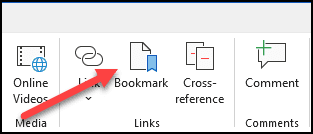
- On the Insert menu click on the Bookmark button:
- On the pop-up window, type in the name of the bookmark that you would like. It’s best to use something that is descriptive but not too long. It’s important to note that you cannot use spaces in this text. If you want to have more than one word, use the underscore:
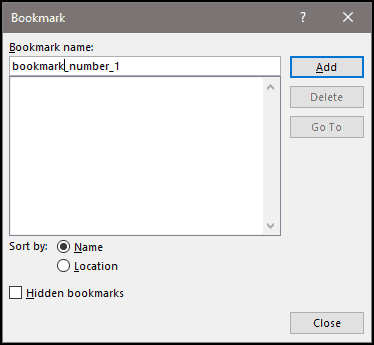
- I have named this bookmark: bookmark_number_1. Once you have done this and clicked Add, then the bookmark has been created.
How to Access the Bookmark?
It’s all very well adding these bookmarks all over the document. However, if you can’t access them then they are essentially worthless. So let’s go through the steps needed in order to access the bookmarks.
There are two main ways in which you can navigate to a bookmark:
- Using the search tools on Word
- Adding Hyperlinks within the document
Using the Search Tools on Word
This way of navigating using bookmarks keeps your document clean. There are no extra lines in it and for this reason, if you want to present your document or print it then this is the way to go.
However, adding anchor links to your bookmarks is the way you need to go if you are using them to navigate through your document. If you want to create a table of contents then this is what you’ll need in order to make it more clear to your readers. This is obviously the option that I’m going to recommend in most cases.
Method #1 – Using the Bookmark
- Click the Bookmark button again and you will see the list of bookmarks that has been created.
- Click on the one that want to access and then click on Go To:
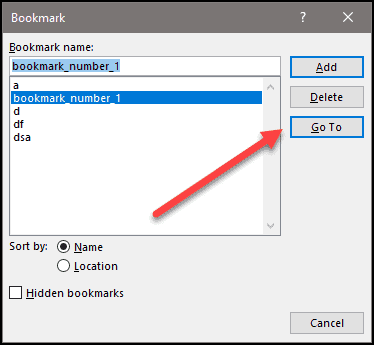
- You are taken to the place on the document where the bookmark is.
Method #2
- On the Home tab, click on arrow next to the Find button:
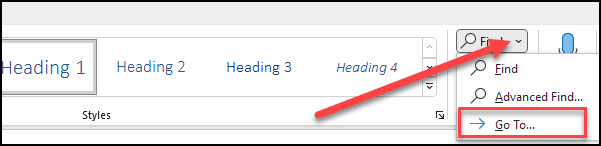
- Click on Go to and a pop-up window appears.
- Select Bookmark in the Go to what box and then select the bookmark that you want:
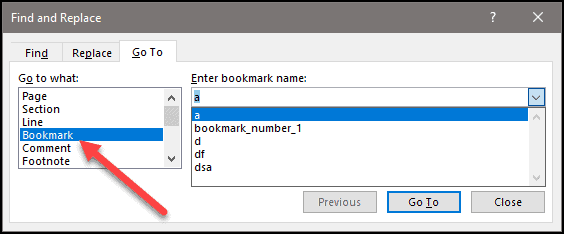
- Click on Go To and you are taken to the place on the document where the bookmark is.
Obviously, method one is much simpler but just in case you wanted a separate way I gave you both?.
Adding Hyperlinks within the document
Just to make sure you know what hyperlinks are – they are the blue links that appear in the text, sometimes underlined, sometimes not. You click on them and then you are taken to a different place.
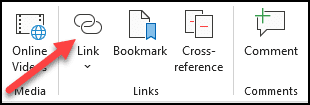
- On the Insert tab, click on the Link button. It’s actually right next to the Bookmark that we’ve been talking about:
- On the pop-up window, click on the Bookmark button:

- On the new pop-up window, you’ll see all the bookmarks that you have added to the page:
- Click on the one that want and press OK.
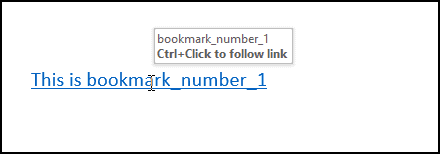
- Back in the first pop-up window, you’ll see that an address has now been filled in as well as the Text to display field. Feel free to edit the Text to display one. DO NOT touch the Address one though. This will break the link.
- Press OK and your link now appears in the document. You can see that it is a link by the way it is displayed. As well as this, when you hover over it with your mouse you can see that it shows you what happens if you click on the link:
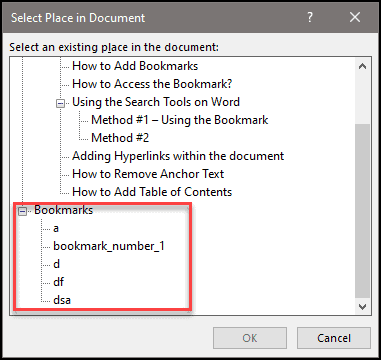
As you see in the Select Place in Document pop-up window, there are a number of different links from which you can choose. And that brings me back to what I said above, by using the built-in styles in Word you can save yourself a lot of bother as every heading 1,2,3 and more is automatically added as a bookmark of sorts. This enables you to have complete control when you are adding hyperlinks in your document.
The Difference between Hyperlinks and Using the Find Tools
The main difference between adding hyperlinks and using the find tools is that of ease of use. If you know the name of your bookmarks, then you can navigate to them using the find tools wherever you are on the page. On the other hand, for any other user, or to show people around the document, without a hyperlink it’s going to be hard.
Neither of them are wrong, it’s purely a question of what you want to achieve when using bookmarks.
In Summary
Knowing how to add bookmarks in word is a really good skill to have if you want to know how to navigate around your documents. There are a few different ways to get to them even though there is only one way of adding them. I hope you have enjoyed this post and, as always, if you have any questions or comments, please leave them below and I’ll do my best to answer them. Good luck!
Itís difficult to find experienced people for this topic, however, you sound like you know what youíre talking about! Thanks